Hashi rules
Hashi, short for Hashiwokakero and also called Bridges, is played on a grid of numbered circles, the islands. You join them with bridges so that every island has exactly as many bridges as its number, and all the islands form one connected network.
Bridges run straight across or down between two islands with nothing in between. Two islands can be joined by one bridge or by two (a double bridge), never more, and bridges never cross each other. The example is a real 7×7 Medium puzzle from the game: 14 islands, solved with 22 bridges on 14 of its 20 possible routes, 8 of them double. Like every puzzle here, it has exactly one solution.
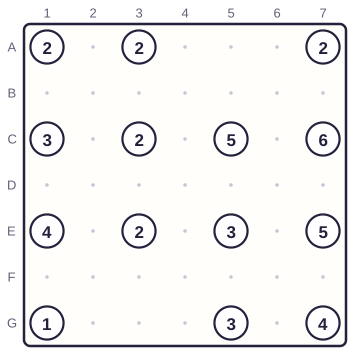
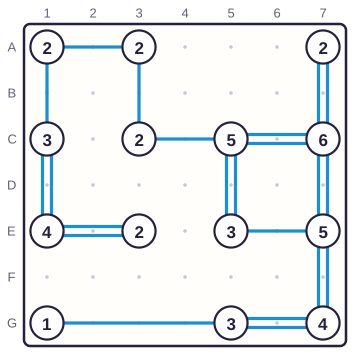
- Bridges run across or down in a straight line, between two islands with nothing between them.
- One or two bridges between the same two islands, never more.
- Bridges may not cross other bridges or pass over islands.
- Each island's number is how many bridges touch it; a double bridge counts as two.
- All islands must form one network: from any island you can reach any other.
How to play Hashi online
Click or tap the route between two islands to cycle it through one bridge, two bridges and none. You can also drag from an island to its neighbour, or click one island and then the other. A bridge that would cross another bridge is refused.
To note a route you have ruled out, right-click it, or press and hold it on a phone: a small × marks it “no bridge”. Tap it again to clear the mark. On a keyboard, click an island, then use the arrow keys to move between neighbours, Shift + arrow to add a bridge in that direction and Alt + arrow to mark that route.
By default an island turns pale once it has all its bridges, and red if it has too many; each has a switch under the board. A third switch, “Check against the answer as you play”, is off: with it on, any bridge or × the solution doesn't have is marked at once. And when every island has its number but the islands are still in more than one group, the line above the board tells you.
Hint explains the next step instead of just placing a bridge. It names the technique, lights up the islands and routes it uses and says why in a sentence, for example “C1 (6) still needs 5, and its open routes can take exactly 5 more: each of them gets as many bridges as it can take.” Place it adds every bridge that step forces; I'll do it myself closes it. Hints work at every level and in every language on the site.
Boards come in 7×7, 9×9 (the default) and 11×11, at four levels. Undo and Redo go back and forth, Pause covers the board and stops the clock, and Reset and Solution ask before they do anything. Your game is saved in this browser: close the tab, and it is waiting when you come back.
| To do this | Mouse or touch | Keyboard |
|---|---|---|
| Add a bridge | Tap the route, or drag island to island | Shift + arrow key |
| Make it double, then clear it | Tap the route again | Shift + the same arrow |
| Mark a route “no bridge” | Right-click or long-press it | Alt + arrow key |
| Move between islands | – | Arrow keys, after clicking an island |
| Get a hint | Hint | H, then Enter to apply |
| Undo, redo | Undo, Redo | Ctrl + Z, Ctrl + Y |
| Pause | The button by the timer | P |
What Easy, Medium, Hard and Expert mean
The level is set by the logic a puzzle needs, not by how many islands it has: a 9×9 has about 19 or 20 at every level. Before you see a puzzle, the engine that gives the hints solves it step by step, and the hardest step it needed sets the level. Every Medium needs isolation, every Hard a closed-off group, and every Expert a “what if?”: the techniques below, in that order. Counting does almost all of the work at every level.
| Level | Islands | Counting steps | Needs beyond counting |
|---|---|---|---|
| Easy | 19 | 100% | Nothing |
| Medium | 19 | 97% | Isolation (100%) |
| Hard | 20 | 95% | A closed-off group (100%), isolation (43%) |
| Expert | 19 | 93% | A “what if?” (100%), a closed-off group (62%) |
Averages over 100 puzzles per level, 9×9, from the generator that runs this page, solved with the hint techniques. Counting steps: the share of steps that count bridges (all routes full, one to each, finished islands, last route).
Daily Hashi, sharing, printing and your stats
The Daily puzzle is a 9×9 that everyone gets on the same day, new at midnight on your clock: Easy on Mondays, Medium on Tuesdays, Wednesdays and Sundays, Hard on Thursdays and Fridays, and Expert on Saturdays. Solve it each day to grow your days in a row; the puzzle you were playing waits until you come back to it.
Share copies a link that carries the whole puzzle, so a friend gets exactly the same islands, and the puzzle number under the board shows you are on the same one. Print makes a PDF of the puzzle you are playing, with its solution, or a pack of up to 50 new puzzles at the size and level you choose, one, two or four to a page. Every printed puzzle is checked again by a separate solution counter before it goes on the page.
Your stats count the puzzles you solve at each size and level, with your best and average times; only solves without hints set a best time. They are saved in this browser only.
How to solve Hashi: all routes full
Almost every step in Hashi is counting: 93% of them even on Expert. Compare an island's number with the bridges its open routes can still take, and start with the case that leaves no choice.
When an island needs exactly as many bridges as its routes can still take, every route takes all it can. C1 (6) already has one bridge, to A1, and needs five more. A1 (2) can take one more, C3 (6) two and E1 (2) two: five in all. So all three routes fill up, with double bridges to A1, C3 and E1.
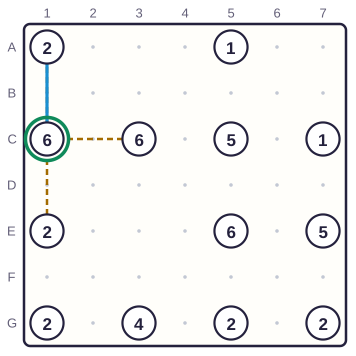
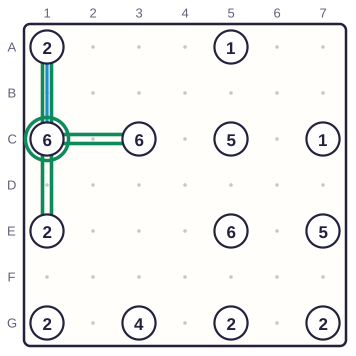
- An 8 always takes double bridges on all four sides.
- A 4 with only two neighbours, as in a corner, takes a double bridge to each.
- A neighbour can only take what it still needs: a 1 never takes more than one bridge.
One to each: one short of full
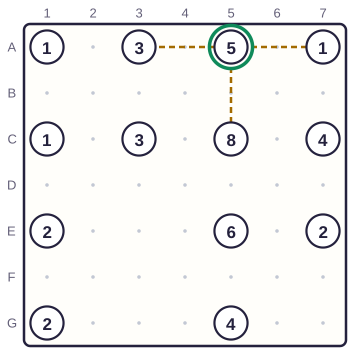
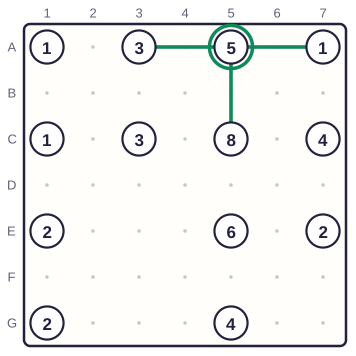
When an island needs one bridge less than its routes can take, every route that could take two gets at least one. At the start, A5 (5) has three neighbours, A3, A7 and C5. Two bridges each would make six, and it needs five, so at most one route ends up one short. Whichever it is, every route still gets at least one bridge.
That puts a single bridge from A5 to A3, A7 and C5 straight away. A 3 with two neighbours, a 5 with three and a 7 with four all work the same way.
Finished islands and the last route
An island that has all its bridges takes no more, so its routes close. That often leaves a neighbour with a single open route, which then takes everything that neighbour still needs.
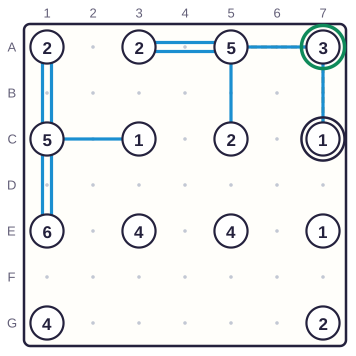
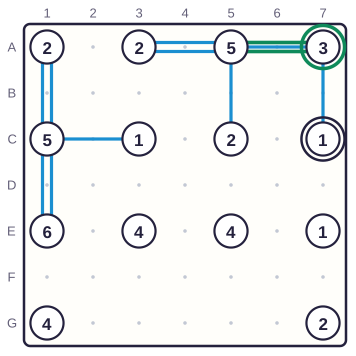
C7 (1) already has its one bridge, to A7, so the route between them takes no more. A7 (3) has one bridge to A5 and one to C7 and still needs one: its only open route is the one to A5, which becomes a double bridge.
Isolation: never close off a pair
All the islands must end up in one network, so a bridge that would finish two islands and leave them on their own is never right. Two 1s joined by a bridge would be a closed pair, and so would two 2s joined by a double bridge. Every Medium puzzle needs this step.
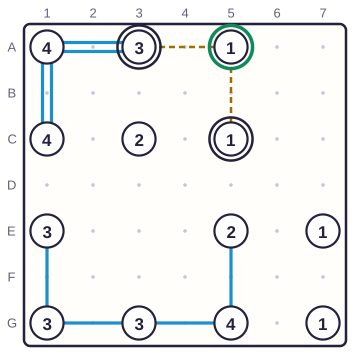
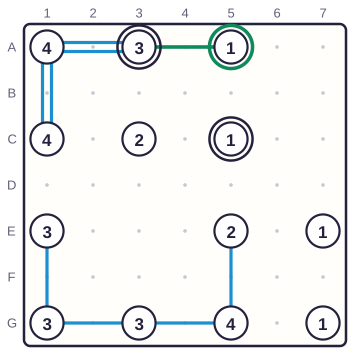
A5 (1) has two neighbours, A3 (3) and C5 (1). A bridge between the two 1s would close them off, so that route stays empty. A3 already has a double bridge to A1 and needs only one more, so A5's bridge goes to A3.
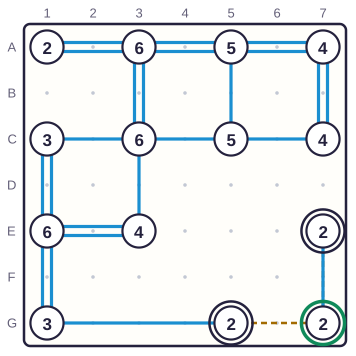
With two 2s the same idea limits the route to one bridge. E7 (2) and G7 (2) are already joined by a single bridge; a second one would close the pair off, so G7 takes its other bridge from G5. In a wider form, a route that is the last possible link to part of the board must be used: the hint panel calls that “Only link”.
Closed-off groups
The same idea works for bigger groups, and every Hard puzzle needs it. Before you add a bridge, check whether it would finish every island in its group while the group still has no way out.
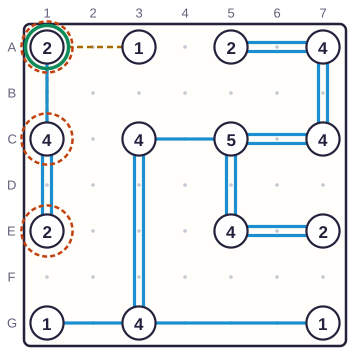
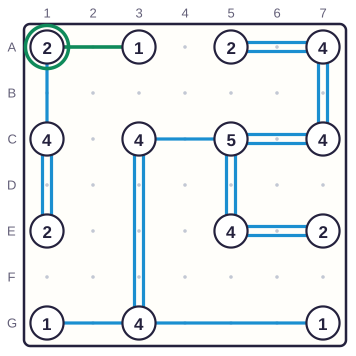
A1 (2), C1 (4) and E1 (2) are joined: one bridge from A1 to C1 and a double from C1 to E1. A second bridge between A1 and C1 would give all three their numbers at once, and they would be cut off from the other eleven islands. So A1 must take its second bridge from A3.
What if? Following a chain
Expert puzzles need at least one step that no single island gives away. Pick a route, suppose a number of bridges on it, and follow the steps that forces until something breaks.
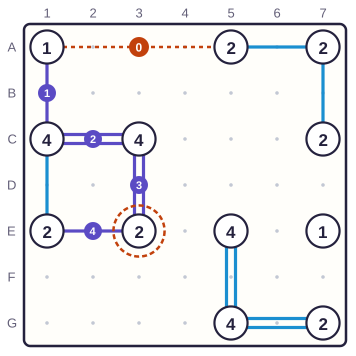
Suppose A1 (1) and A5 (2) had no bridge between them. A1 would then take its bridge from C1, and the counting steps follow one after another: a double bridge between C1 and C3, a double between C3 and E3, and a bridge from E1 to E3. Now E3, a 2, has three bridges. That breaks its number, so the supposition was wrong: A1 and A5 are joined by a bridge.
The hint panel tries the routes for you and says which rule the chain breaks. When you try it yourself, start from an island with only two open routes: each guess then forces the most.
How the puzzles are made and checked
The generator scatters islands over the grid, never side by side, joins them in a random network of routes that don't cross, sometimes with a loop, puts one or two bridges on each route it used, and reads the island numbers off that network. Most such boards have more than one answer: the table shows how few of the raw boards have exactly one.
So the game doesn't simply throw boards away. It solves each one with the hint techniques; when they get stuck, it changes one bridge they couldn't decide from single to double or back, updates the two numbers, and tries again. A board is shown only when those steps finish it: then it has exactly one answer, and the hardest step it needed is its level.
The daily puzzles, the first board you see and every printed puzzle are also checked by solution counters written separately from the game's engine.
| Board | Islands | Raw boards with one answer | Share |
|---|---|---|---|
| 7×7 | 13 | 86 / 300 | 29% |
| 9×9 | 20 | 33 / 300 | 11% |
| 11×11 | 27 | 15 / 300 | 5% |
300 raw boards per size from the generator, before any repair, counted by the game's solution counter.
A solver and more puzzles that join things up
Stuck on a Hashi from a newspaper, a book or an app? Enter it in the Hashi solver to check that it has one solution or to see the next logical move.
If you like joining things up, try Numberlink, where paths join pairs of numbers without crossing, or Masyu, where one loop passes through every circle. How every puzzle on this site is generated and tested is explained in how we make and test puzzles.